
Jacob Schultz
I'm a firefighter building toward a career in IT. I run my own self-hosted infrastructure, work with Docker and Linux, and am actively implenting skills to engineer solutions in my current role. I have independently developed systems that solve real world problems to allow faster, safer, and more efficient emergency response. I bring a background in high-pressure, high-stakes decision making, cohesive teamwork, and creative problem solving to everthing I do.
Contact Information
Resume
Experience & Projects
Automated Firehouse Priority Alerting System
Critical delay in alerting for priority incidents and frequent outages of the in-place alerting system
A faster, reliable, apparatus specific alerting system that functions completely independently of the un-relaible in-place system. Alerts only for specific priority incidents with a unique tone for each apparatus, significantly reducing responce times for high priority emergency incidents.
I also created a backup alerting system that alerts for every incident, also with a apparatus specific tone, that is utilized when the in-place CAD alerting system frequently fails.
This project took place in a firehouse built in 1992 with decades of accumulated network infrastructure, no labeling, no documentation, and a network closet that looked like it hadn't been touched in years. My goal was to build a system that would detect incoming structure-fire dispatch tickets as they printed and trigger unit-specific audio alerts over the firehouse PA. The in-place CAD dispatch system was slow to alert for these incidents and went through a long sequence of tones and speech before it would actually tell us which of the 3 possible apparatus was dispatched. We would be ready to respond but were delayed waiting to find out which truck to get on.
The first challenge was simply understanding what I was working with. I connected my HP laptop running Ubuntu Desktop directly to the main switch and began mapping the network. Using ARP scans and ARP table lookups, I identified the relevant subnet and tracked down the IP addresses of the devices I needed. From there I ran Wireshark to capture and analyze live traffic, filtering down by the printer's IP to isolate its print jobs. Several different sources were sending traffic on different ports, so I worked through each one until I confirmed that the dispatch print job was consistently arriving on port 9100.
With the traffic I needed, I connected my Netgear 5-port managed switch between the main switch and the printer. The default IP for the Netgear switch was on a different subnet, so I used ARP scans again to find the MAC address of the switch and log in to configure what I needed. Port 1 connected to the main Cisco switch, port 5 connected to the printer, and I configured port mirroring so that all traffic on port 5 was duplicated to port 3, which was connected to my Lenovo ThinkCentre. Port 4 was disabled since it wasn't needed. Port 2 was reserved for my laptop so I could access the setup locally without disrupting anything. The printer's normal operation was completely unaffected, and my setup was entirely passive from the printer's perspective.
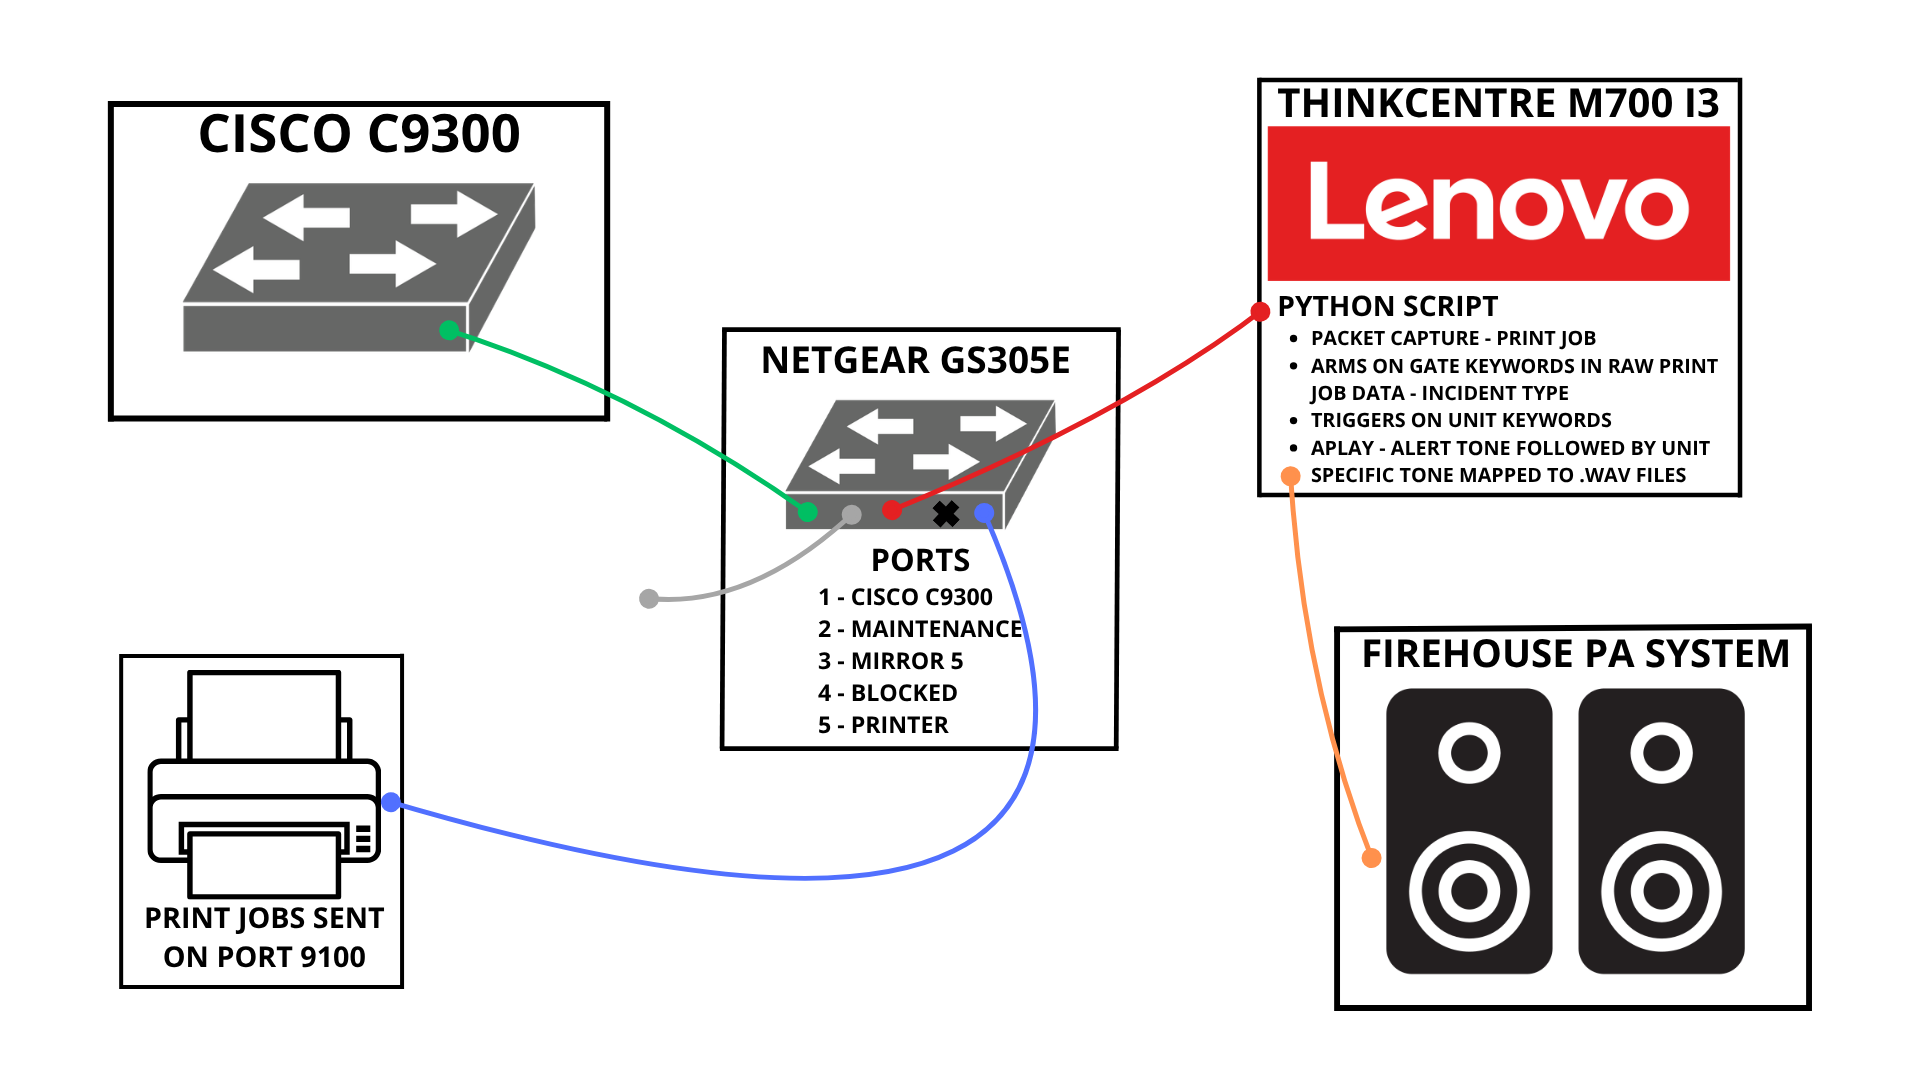
For the always-on monitoring system I used a Lenovo ThinkCentre M700 I acquired secondhand, wiped it, and installed Ubuntu Server. I joined it to my Tailscale VPN so I could have secure remote access to the machine from anywhere without exposing it to the public internet. I considered using a spare old laptop; however, I wanted something more reliable to run 24/7.
The core of the system is a Python 3 script. I found very quickly that my Python skills were insufficient for the program I wanted. I used Claude Code to help generate what I needed. Claude Code was very helpful and allowed me to make changes myself to learn as I went. The script uses Scapy to sniff raw TCP packets arriving on port 9100. As each packet arrives, it is accumulated into a rolling buffer keyed to the specific network stream (source IP, source port, destination IP, destination port), allowing the program to track individual print jobs in real time without waiting for them to complete.
Detection works in two stages. First, the buffer is scanned for gate keywords, like STRUCTURE FIRE, STRUCF, or HOUSE FIRE, that indicate a structure-fire dispatch is coming through. Once armed, the program scans for unit-specific codes, for example PF/E818 for Engine 818 or PF/TW818 for Tower 818, that are mapped to unique .wav audio files. The moment a match is found, it plays an alert tone followed by the unit-specific sound. I went through several iterations of the code, tuning the keyword matching, the rolling buffer size, stream timeout logic, and the audio playback sequence to get the timing and reliability exact.
In addition to this program, I modified the script to also act as a backup full alerting system. The in-place alerting system is very unreliable and fails multiple times every month. When this happens, the firehouse is not alerted for emergency incidents and requires a person to monitor the radio 24/7 to alert the crew manually for emergency responses. The company is usually unable to come out to fix the system for 24-48 hours. To help with this problem, I modified the Python script to alert for every incident type. I changed the gate keyword to one that will be present for every incident type and assigned a simple spoken-word alert for each respective unit. Both of these scripts run as services. The original program will restart automatically if interrupted and will run automatically upon startup. The backup program is also a service; however, it is turned on and off as needed when the in-place system fails. I have utilized this many times and turned it on and off via SSH from my phone, which is also connected to my Tailscale VPN.
The next problem I ran into was getting the audio output to the firehouse speakers. Here the old, outdated firehouse and network infrastructure worked to my advantage. When the new alerting system was installed a few years prior, the previous audio system and speakers were never removed, they simply added more speakers. So the old speakers connected to the PA system were left intact and independent of the in-place alerting system. Unfortunately, the PA system controller was about 120 feet away from my ThinkCentre and on the 2nd floor. Again, the laziness of those before me worked to my advantage. The old ethernet cables that ran from the area of the switch to the old server room that contains the PA controller were left in place. Rather than running new cable through the whole building, I used a toner probe to trace the existing ethernet runs from the switch area up to the PA room, found one that was usable, and labeled it properly.
To bridge the audio over that ethernet cable, I used a pair of baluns, one on the ThinkCentre end converting the 3.5mm aux signal to an RJ45 connector, and another on the PA room end converting back from RJ45 to RCA, which plugged directly into the PA system controller. It's a simple and reliable analog trick that saved the cost and hassle of running any new cable through a building with 30+ years of mystery infrastructure in the walls.
This project touched nearly every layer of the stack, physical infrastructure, network analysis, server administration, software development, and analog audio engineering. Navigating an undocumented network built up over three decades taught me how to be methodical and systematic when the environment gives you nothing to work with. The end result is a fully functional system that alerts faster, more efficiently, and much more reliably than the in-place system. The backup alerting system I created has been utilized many times due to failures of the in-place system and has run for days at a time without fail while waiting for the company to come fix it. This removes the need to have personnel dedicated to monitoring the radio 24/7 and manually alerting the entire crew. Both programs have significantly increased the crew's ability to respond to emergency incidents. My program consistently allows firetrucks to get out the door 10–30 seconds faster than before, and for these incidents, seconds can make the difference between life and death.
Maintenance Tracking & Notification Automation
Improve the tracking of changes and updates to the status of apparatus/equipment.
Implement a uniform and reliable system to notify all drivers of these changes and updates.
This provides a simplified and streamlined process to achieve both goals. Users only need to fill in a few fields on a Google Form. The Google Form is linked to a Google Sheet, which runs a Google Apps Script to automate the notifications. Update tracking is organized in the Google Sheet, making it extremely easy to reference for future maintenance intervals and questions.
The automation was a huge improvement over the informal and unreliable practices used prior to this. Previously, someone "making notification" of a change would maybe send a text to a few people, write it down in the logbook, or on one of the 12 whiteboards around the firehouse. Better yet, they might do nothing but try to remember to verbally pass it on and inevitably forget. Important updates routinely fell through the cracks and failed to be logged — often very important information that significantly impacts the condition and readiness of the apparatus, affecting our ability to respond to emergencies. Now there is a uniform process that automatically tracks, organizes, and notifies, eliminating failures of communication.
The idea began while discussing how poorly important information regarding apparatus is communicated between shifts. It is very important that these updates are effectively communicated because they affect the in-service apparatus. Any faults with these apparatus could result in a failure to perform effectively on emergency incidents, costing lives. Beyond life safety, knowing the mechanical condition of a 74,000-pound vehicle before getting behind the wheel is simply good practice. My coworker mentioned that at a previous firehouse, a while back, there was an email system set up that would automatically track updates and notify the drivers. I jumped at the opportunity to figure this out, even though I was just starting my IT education and had no idea how to do it.
I started doing research and figured out you can link a Google Form to a Google Sheet, which automatically sends the information to the sheet. So I made a Google Form with the different categories of apparatus and equipment, as well as firehouse facilities and appliances. I made drop-down boxes to select relevant information and a write-in box for a brief description. I linked this to a Google Sheet and tested it to see how the information would populate in the spreadsheet. I saw that it dumped the information into the first sheet consistently and in the same columns. So I created additional sheets for apparatus, equipment, and firehouse tracking. My goal was to get the information from the main sheet — where everything from the form is sent — routed to its respective sheet. For example, I wanted just apparatus information on the apparatus sheet, equipment on the equipment sheet, and so on. Looking at the main sheet, I noted which cells contained which information. I then did just enough JavaScript/Apps Script research to get myself into trouble and began scripting. In Apps Script I made a variable for each piece of information by mapping it to the column and using a function to get the last row. Once I had a variable for each piece of information, I created a function that upon a form submission, would send the applicable information to the correct secondary sheet. Each category of information was assigned a variable containing the relevant cells, and the sheet for each category was named accordingly. Then, based on the category (apparatus, equipment, or firehouse), the last row was appended to the respective sheet. Essentially, the first question on the form was the category, which translated to the first column of cells in the main sheet, and determined which other cells were sent to which sheet.
This resulted in 4 total sheets. The first was the raw dump from the form. The second was the apparatus sheet, which was logged clearly and uniformly, with sheets 3 and 4 following the same structure. For the apparatus sheet, I also color-coded each unit. The firehouse has 6 total units: E818, RE818, TW818, SQ818, PA818, and A818. Each unit was assigned a color by setting the cell background fill to match automatically. The sheet was now very easy to read and differentiate.
Now that everything was organized, I began efforts on notifications. Through research I found a built-in function of Apps Script that will automatically send an email, all I have to do is define and provide the arguments. Using the same variables as before, I added a few new variables for the recipient, subject, and body of the email. The recipient was set as a constant — a list of personnel email addresses as CCs. For the subject, I used a template literal expression to keep the line consistent while inserting the applicable unit name to make it relevant to each submission. I did the same for the body; while it was a longer string, I wanted it to read naturally for those being notified. For one part I could not use the same method, because I wanted the string to insert "is" or "is not" depending on whether the unit was marked out of service. I used an if/else statement to insert the applicable phrase. The result was an almost instantaneous notification when the Google Form was submitted. The only thing that would need to be edited in the future was the list of CC email addresses, to add or remove personnel at the station captain's request.
There was now a quick, easy, and uniform way to document changes and updates. Even if someone did not receive push notifications when they were off from work, all they needed to do was check their email. The most difficult part had nothing to do with code, it was getting everyone to actually use the Form. A huge amount of time had been wasted just trying to figure out what was going on with the apparatus, who did what, what went wrong over the weekend, and so on. Now the time spent texting, calling, and asking around just to do the job can actually be spent doing the job. And gone were the days of trying to remember or think back or page through old log books to figure out when scheduled maintenance was due. Now it was easy and simple to find when the last annual inspection was completed, or when the quarterly maintenance was done. While it is a relatively simple program, I learned a lot during the building process. It was an excellent opportunity to put what I have learned into practice and expand what I have learned to new areas. This simple program has made a massive difference in the effectiveness of communication, logging, and referencing for future maintenance. It was so effective, I built an almost identical program for my fiancee and I to use for wedding planning.
Self Hosted Cloud Storage
To learn, to maintain complete ownership and control of my data, and to avoid paying a subscription fee.
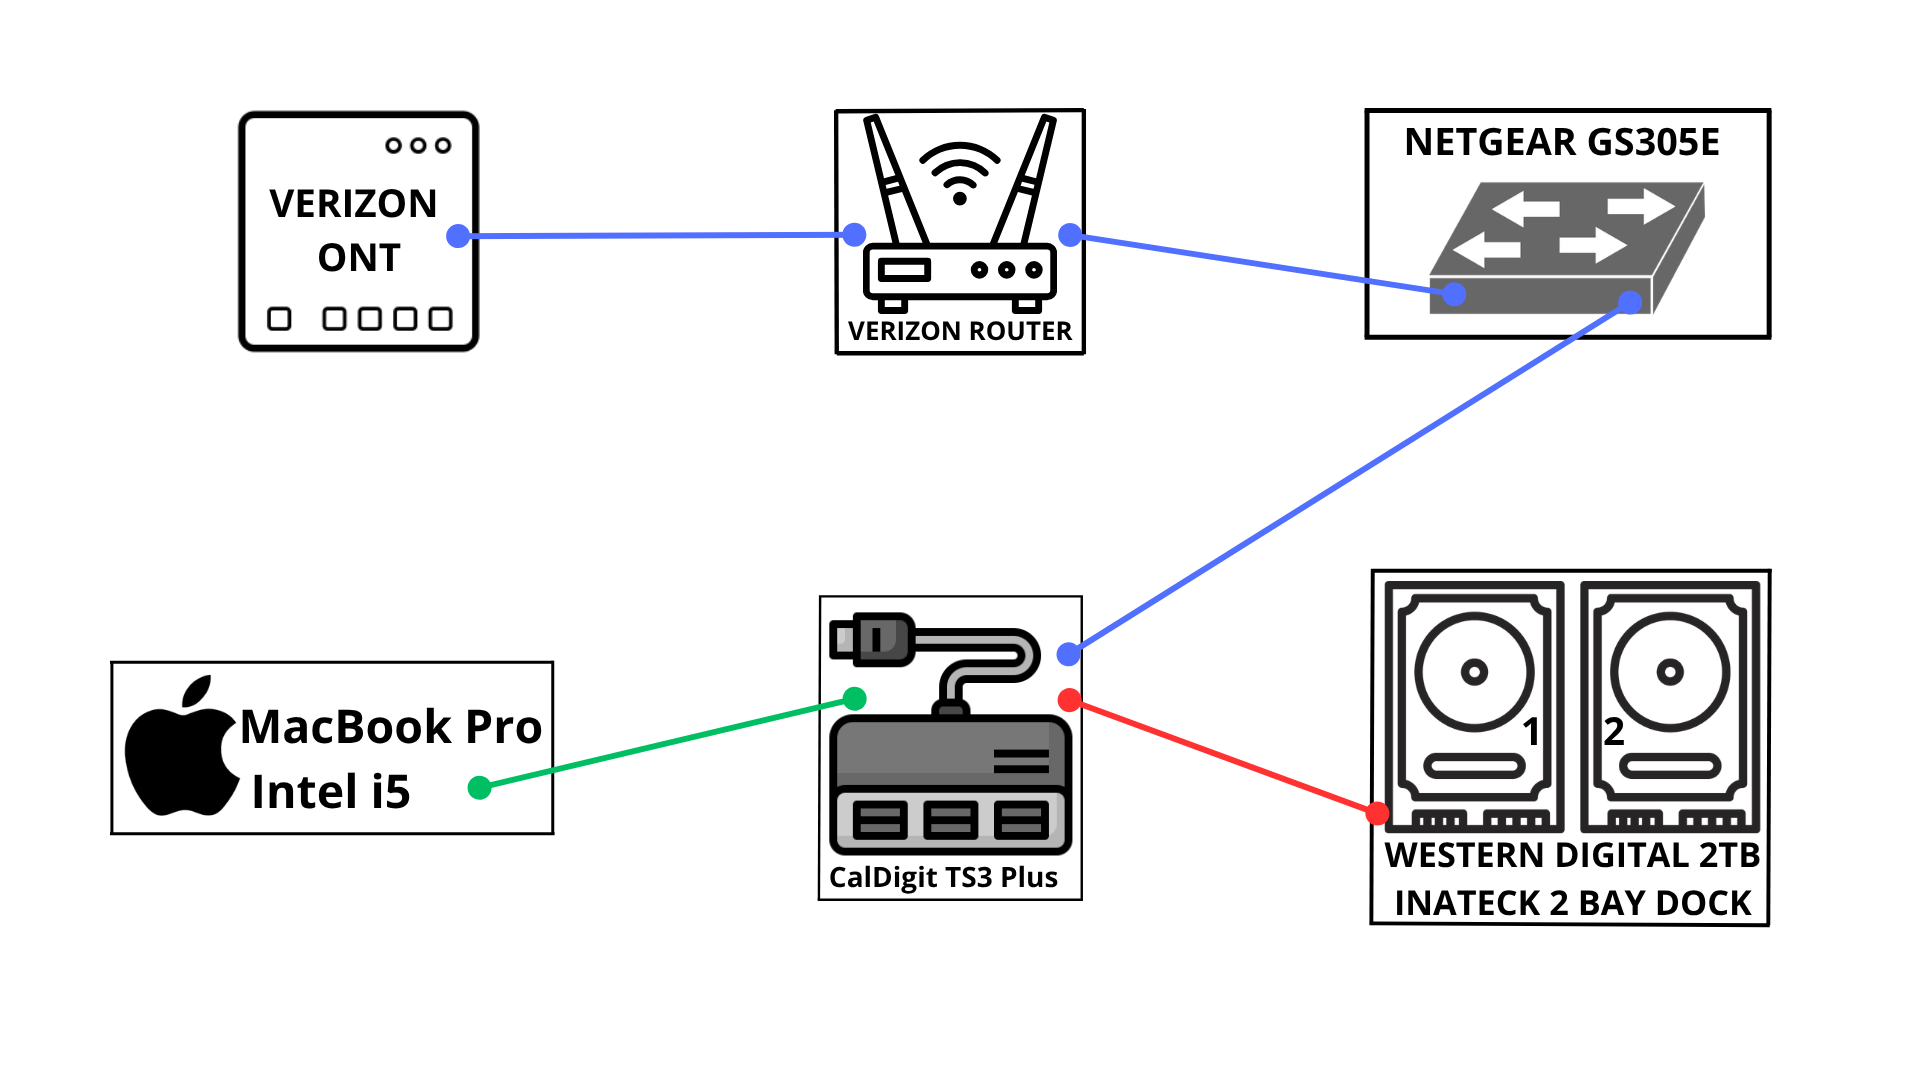
A containerized Nextcloud server running on an old Intel-based MacBook pro with a broken screen, converted to an NVMe drive to run Linux and Docker. Attached to a 2-bay HDD bay with 2 Western Digital 2TB drives operating in RAID 1. Accessed remotely via a Cloudflare tunnel linked to my Domain.
This project involved building a self-hosted cloud storage server from repurposed hardware, with the goal of creating a secure, privately owned alternative to commercial cloud storage services such as Google Drive or Dropbox. The project provided hands-on experience with Linux server administration, containerization, network storage, and secure remote access.
The server is built on a 2017 Intel-based MacBook Pro with a failed SSD and a damaged display. Before committing to any hardware purchases, I performed diagnostics by creating a bootable macOS USB drive and booting into recovery mode. Disk Utility confirmed the internal SSD had failed, while the rest of the system remained fully functional. I further validated the hardware by successfully booting a live Ubuntu Desktop environment from the same USB drive.
Because the MacBook uses a proprietary SSD form factor, I purchased a used 22x30mm NVMe drive paired with a compatible adapter to interface with the MacBook's motherboard. This allowed me to install a standard consumer NVMe drive in place of the more expensive Apple proprietary module.
For physical storage, I purchased two Western Digital 3.5" HDDs housed in a 2-bay USB 3.0 enclosure. Given the MacBook's limited connectivity — only two Thunderbolt 3 USB-C ports — I utilized a CalDigit TS3 Plus port replicator, which provided USB-A ports for the drive enclosure, a few USB-C ports, and a dedicated Gigabit Ethernet port for wired network access. The CalDigit connects to the MacBook via a single Thunderbolt 3 cable and supplies power, consolidating all connectivity into a single connection.
All of these devices are located in the closet of my guest bedroom because that is the location of the Verizon optical network terminal. Unfortunately, when my apartment was built only one ethernet connection was installed and it terminated on the wall of the living room. I utilized a shelf directly next to the ONT in the wall of the closet, where there was also a plug for power. I used a surge-protected power strip mounted to the wall to neatly supply all devices with power. To save cost and make things as neat as possible, I crimped my own Cat6 ethernet cables to the exact length needed. I connected the router directly to the ONT, the router to my 5-port Netgear managed switch, and the switch to the port replicator of the MacBook. The 2-bay HDD dock I connected via USB 3.0 to the port replicator as well. Everything was spaced evenly with plenty of airflow. After monitoring CPU temps, I configured the laptop to run with the lid closed and removed the backing plate to allow maximum airflow to the fan and CPU.
Ubuntu Server 24.04 LTS was selected for its long-term support lifecycle through 2029, strong Docker compatibility, and large community support. Because the MacBook's display was damaged, initial setup was performed using my television and a wireless keyboard. Once the OS was installed and SSH was configured, I was able to access it remotely from my M1 MacBook.
Both HDDs were formatted as ext4 and mounted as persistent volumes via /etc/fstab using UUID-based references to ensure consistent mounting across reboots. All fstab entries include the nofail flag to prevent the system from entering emergency mode if a drive is unavailable at boot. The nofail flag was added after Ubuntu began booting into emergency mode due to the removal of a portable HDD used during testing prior to the two main drives.
Rather than implementing a traditional hardware RAID configuration, I went with a scheduled rsync job running nightly at 2:00 AM via cron. This mirrors the contents of the primary data drive to the secondary drive without the overhead of a RAID controller, conserving system resources for other services. This method also provides a recovery window — files deleted accidentally are not immediately removed from the backup until the next sync cycle.
Prior to this project I had no hands-on experience with Docker. After research and comparison with traditional virtual machines, I chose Docker for its lightweight resource footprint, ease of deployment, and simplified service management.
The Nextcloud stack was installed using Docker Compose and consists of three containers: Nextcloud — the primary application, running Apache and PHP, exposed on host port 8080; MariaDB — the database backend responsible for storing user data, file metadata, and application settings; and Redis — an in-memory caching layer that improves application performance and session handling. All three containers are connected on a shared Docker network for internal communication and are configured with restart: always to ensure automatic recovery after system reboots.
Portainer was additionally deployed as a single container. It is a graphical interface accessible from a browser for monitoring and managing all Docker containers, viewing logs, and tracking resource utilization. Access to the Docker socket was granted to allow full container management through the UI.
Tailscale was installed to provide secure, encrypted remote access to the server over a private mesh network. This enables SSH access and local service access from any authorized device without exposing the server directly to the internet. All of my devices, as well as both servers, are on the Tailscale network.
For public-facing access, a Cloudflare Tunnel was configured using the cloudflared daemon. After authenticating with Cloudflare and registering a custom domain, a named tunnel was created with ingress rules forwarding nextcloud.schultzserver.com to the loopback address on port 8080, and portainer.schultzserver.com to port 9000. DNS CNAME records were created in Cloudflare pointing each subdomain to the tunnel endpoint. The cloudflared service was installed as a systemd unit to ensure it starts automatically on boot. Using the loopback address rather than dynamic Docker container IPs ensures routing remains stable across container restarts.
The result is a fully functional, self-hosted cloud storage platform accessible from any browser at nextcloud.schultzserver.com, with a Portainer management dashboard at portainer.schultzserver.com. The Nextcloud desktop and mobile apps provide seamless file sync across devices. All data is stored on privately owned hardware, with nightly redundancy to a secondary drive and secure remote access via both Tailscale and Cloudflare Tunnel. This was a great learning experience — I was able to apply things I had learned to a hands-on project and pick up entirely new skills along the way. I am looking forward to expanding and upgrading in the future.